How to install a pull-out trash can
This is a forty-minute job if you measure first and a weekend of swearing if you do not. The whole difficulty is in two decisions made before any screw goes in: bottom mount or door mount, and where the front of the frame sits.
By Ryder M. · Last reviewed October 10, 2026
Lid & Liner is reader-supported. If you buy through a link on this page we may earn a commission at no extra cost to you. It never changes which product we rank first — how we pick and how we make money.
The short answer
Measure the clear opening, choose bottom mount if you want the simpler install and door mount if you want the cabinet door to pull the bins out, then mount the frame square to the front of the cabinet and set the door bracket last. Tools: a tape measure, a pencil, a cordless drill with a short bit, a square, and a bradawl. The two things that go wrong are a frame set back too far from the opening, and a door bracket adjusted before the frame is confirmed square.
You are not building anything. Every mainstream kit is pre-drilled, and the whole job is transferring four or six hole positions accurately onto a cabinet floor. Accuracy at that stage is what determines whether the unit still runs smoothly in two years.
Bottom mount or door mount - decide first
| Bottom mount | Door mount | |
|---|---|---|
| How it works | Frame screws to the cabinet floor; you open the door, then pull the frame | Frame links to the door; pulling the door brings the bins out |
| Install difficulty | Easier - four to six screws into the floor | Harder - the door bracket needs careful adjustment |
| Daily use | Two actions | One action |
| If it goes wrong | The frame binds | The door sits proud of the cabinet run |
| Best for | A first install, or a cabinet with an awkward door | A kitchen you are keeping, done carefully |
If you have not done this before, fit a bottom-mount unit. Door mounting is genuinely better to live with, and it is also the version that shows every millimetre of error on the face of your cabinetry. The simplehuman 35L is the exception worth knowing about: its track arrives as one pre-assembled piece, which removes most of the alignment risk from either approach.
The easiest unit to install, and the one with the best slides if you are fitting a kitchen you intend to keep.

Best pull-out overall
simplehuman 35L Dual Compartment Under-Counter Pull-Out Can
The pull-out that is easiest to install and hardest to break: an all-steel frame on commercial ball-bearing tracks that arrive as one pre-assembled piece.
Price as of October 16, 2026. #ad How we make money
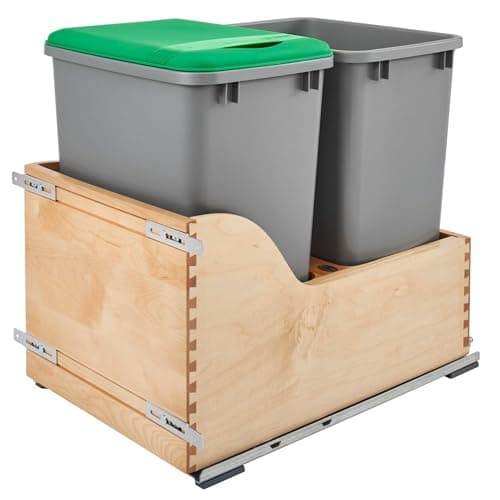
Best slides
Rev-A-Shelf 4WCSC-1835DM-2 Bottom-Mount Double, 2 x 35 Quart
The version fitted with real Blum Blumotion heavy-duty slides — the same hardware that goes into high-end cabinetry.
Price as of October 16, 2026. #ad How we make money
Before you open the box
- Clear opening width at the narrowest point, with the door fully open. Compare it against the unit's published minimum, not against the cabinet's nominal size.
- Clear height from the cabinet floor to the underside of the top rail. Bottom-mount units need this; the Rev-A-Shelf 4WCSC states 20-5/8 inches.
- Depth to the back wall, past the plumbing. The trap under a sink is the usual obstruction.
- Hinge intrusion. Open the door and look for anything protruding into the opening at bucket height.
- Whether the cabinet floor is solid. A thin, unsupported floor panel will flex under two full buckets, and a flexing floor is what pulls slides out of alignment. Add a plywood pad if it moves under hand pressure.
Those five checks take ten minutes and they are the difference between an install and a return. The full routine, including what to do about the trap, is in how to measure a cabinet for a pull-out can.
The install, in eight steps
Step 01
Empty the cabinet and clean the floor
Everything out, including whatever is taped to the back wall. Wipe the floor - a frame mounted on grit sits on grit, and you want to see your pencil marks.
Step 02
Dry-fit the frame with the buckets out
Slide the empty frame in and check it clears the opening, the hinges and the plumbing. Do this before any marking. If it fouls anything now, it will foul it forever.
Step 03
Set the front-to-back position
This is the step that decides whether the job works. The frame front should sit far enough back that the buckets clear the door and the face frame when they travel, and no further. On a face-frame cabinet, allow for the frame thickness. Mark the frame's front edge on the cabinet floor with a pencil.
Step 04
Square it, then mark the holes
Put a square against the cabinet side and the frame. A frame mounted even slightly out of square binds under load. With it square and on your front line, mark every pre-drilled hole through onto the floor.
Step 05
Pilot the holes with a bradawl or a short bit
Use a short bit and a depth stop or a strip of tape - cabinet floors are thinner than they look and the bottom of that cabinet may be the top of a drawer or a dishwasher. Pilot at every mark; do not drive screws into particleboard dry.
Step 06
Screw the frame down, front screws first
Front pair snug but not fully tight, check square again, then the back pair, then tighten everything. Frame-first-then-check is what stops a unit that was square on the mark from ending up skewed.
Step 07
Run it empty, then loaded
Slide it in and out ten times with nothing in it, then with both buckets full of something heavy. It should run without catching at any point of the travel. Any resistance now is a misalignment to fix now, not a quirk to live with.
Step 08
Fit the door bracket last, if it is door mount
With the frame proven, attach the bracket to the door and the frame, close the door, and check the face sits flush with the cabinets either side. Adjust the bracket - not the frame - until it does. Budget fifteen minutes for this step alone.
If it binds, rattles or sags
Binding at one point in the travel
The frame is not square, or the cabinet floor is flexing under load. Loosen all the screws, re-square against the cabinet side, retighten front-first. If the floor moves under hand pressure, add a plywood pad under the frame.
The door sits proud of the run
Door bracket, not frame. That is what the bracket adjustment exists for, and the fix is a few millimetres at a time with the door closed between each attempt.
A bucket cracked at the handle cut-out
The normal failure, and not a reason to replace the kit. Rev-A-Shelf sells 35-quart replacement containers for its RV-series frames - confirm your frame series before ordering, because other lines take different buckets at misleadingly similar dimensions.
The whole thing was a mistake
It happens, usually in a rental or a kitchen with one usable cabinet. Pull-out pros and cons is the honest accounting, and renter-friendly options covers what to do when drilling is not allowed.
Common questions
How hard is it to install a pull-out trash can?
A bottom-mount unit is a forty-minute job with a drill and a square. Door-mount units take longer because the bracket has to be adjusted until the cabinet door sits flush with the run.
Do you need to drill to install a pull-out trash can?
Yes for any frame-mounted unit - the frame screws to the cabinet floor. If drilling is not an option, a freestanding slim can or an over-the-door hanging bin is the alternative.
Bottom mount or door mount - which is better?
Door mount is better to live with because one action opens everything, and bottom mount is easier to install and more forgiving of error. For a first install, fit bottom mount.
What tools do I need?
A tape measure, a pencil, a square, a bradawl, and a cordless drill with a short bit and a depth stop. Use the screws supplied rather than longer ones.
Why does my pull-out trash can bind?
Almost always because the frame is out of square or the cabinet floor flexes under two full buckets. Loosen the screws, re-square against the cabinet side, retighten the front pair first, and add a plywood pad if the floor moves.
Can you install a pull-out trash can in a sink cabinet?
Often, yes, but depth is the limiting factor rather than width because of the trap. Dry-fit the empty frame before marking anything, and check the unit's published minimum depth.
Sources
Every specification on this page traces to one of these, checked at the time of writing. Where a manufacturer does not publish a figure, the page says so rather than estimating it.
- simplehuman - 35L Dual Compartment Under Counter Pull-Out Can (pre-assembled one-piece track, minimum opening)
- CabinetParts - Rev-A-Shelf 4WCSC-1835DM-2 (minimum opening, bottom mount, Blum Blumotion slides)
- Rev-A-Shelf - RV series pull-out waste containers
- Amazon - Rev-A-Shelf RV-35-52 replacement 35-quart containers
Read next
- Pull-Out & Slim CansUnder-sink pull-outs, narrow cans, cabinet hardware, and how to measure first.
- How to measure a cabinet for a pull-out canFive measurements with real published minimums to check them against.
- The best cabinet pull-out hardwareHardware and spares, and how to tell which frame you already have.
- Pull-out trash can pros and consWhat a cabinet pull-out really buys you, what it costs, and the four cases where a freestanding can wins.
- Pull-out trash cans for a 12-inch cabinetWhich pull-out units fit a 10.5-inch cabinet opening, which need 15 inches, and the slot-filler answer when nothing fits.
The author
Ryder M.
Owner and editor of Lid & Liner, published by Magoo Media Group. He started the site after getting tired of the same problem everyone has: every “best trash can” article covers ten products and none of them tells you whether a 13-gallon bag actually fits a 13-gallon can. Lid & Liner covers one category and tries to cover it completely.
Last reviewed October 10, 2026. Spotted an error? Tell us and we will correct it and note the correction.